How to Reduce Image Dimensions Without Losing Quality
Downscaling removes data rather than inventing it, so it should not cost quality. Here is why images still end up looking soft, and how to actually avoid it.

Quick answer
Reducing an image's pixel dimensions is fundamentally safer than enlarging one, since you're removing data rather than inventing it. Quality loss during downscaling almost always comes from one of three things: a poor resampling algorithm, resizing after compressing instead of before, or reducing dimensions so far that fine detail is genuinely gone. Fix those three and dimension reduction is close to free.
You shrink a photo down for a website thumbnail and it comes out looking soft, slightly noisy, not quite right. The instinct is to blame the act of resizing itself, as if making an image smaller inherently costs quality. It doesn't, not in the way most people assume. Reducing dimensions removes pixels the image already has. Nothing needs to be invented, unlike enlarging an image, where the software has to guess at detail that was never there. When a downscaled image looks worse than it should, something specific went wrong in how it was resized, not the resizing itself.
The Myth Worth Debunking First
A piece of advice that circulates constantly: resize in small increments, halving the dimensions repeatedly rather than jumping straight to your target size in one step. This was more relevant advice for older or cheaper scaling tools, particularly for upscaling, where each step compounds interpolation error. For downscaling with a proper resampling algorithm, doing it in one step is not just fine, it's usually the better choice, since a single well-designed resize calculates the correct output directly rather than accumulating small rounding losses across multiple passes.
If a tool's single-step downscale looks worse than a multi-step one, the actual problem is almost always the algorithm being used, not the number of steps. That's the real thing worth checking, covered next.
Why Downscaling Actually Loses Quality
The resampling algorithm matters more than anything else. Not all resize methods are equal, and the difference shows up specifically in how they handle the pixels being removed. Nearest neighbor just deletes pixels outright, keeping the closest one and throwing away its neighbors, which produces blocky, aliased results. This is fast but genuinely low quality. Bilinear and bicubic interpolation average nearby pixels into the output, producing smoother, more accurate results for photographs. Lanczos resampling uses a wider sampling window and tends to preserve fine detail and sharp edges best, particularly useful for text, product photography, or architectural shots with a lot of straight lines.
There's a specific trap here worth knowing about directly: a browser's native, fastest canvas scaling method can produce a genuinely noisy, fuzzy result on a large reduction, since it can effectively transfer a source pixel to a destination position without properly accounting for the neighboring pixels being discarded. This is a real, documented limitation of naive canvas scaling, not a myth, and it's exactly what a proper resampling library is built to avoid.
Resizing after compressing instead of before compounds existing damage. If a photo has already been compressed once, JPEG artifacts and lost detail are baked into the pixels. Resizing that already-degraded image doesn't remove the damage, it just shrinks a photo that was already compromised. Worse, resizing a heavily compressed image can make blocky JPEG artifacts more visually obvious relative to the new, smaller canvas, since the same-sized artifact now covers a larger proportion of the image.
Reducing dimensions past a genuine detail threshold isn't a quality bug, it's physics. If you shrink a 4000 pixel photo down to 200 pixels, fine texture that existed in the original simply can't be represented at that pixel count anymore. This isn't the resize algorithm failing, it's the destination size genuinely not having room for that level of detail. The fix here isn't a better algorithm, it's picking a target size that actually fits your use case.
The Algorithm
For most photographic content, a general bicubic or a well-implemented downscale filter handles the job cleanly, and this is what the resize tool uses under the hood through a dedicated resampling library rather than relying on the browser's fastest built-in scaling method.
For content with a lot of fine detail specifically, text, product photography with sharp edges, architectural or interior shots with straight lines, Lanczos-style resampling tends to hold up best, at the cost of being more computationally demanding than a simpler bicubic pass.
Step-by-Step: Reducing Dimensions Without Losing Quality
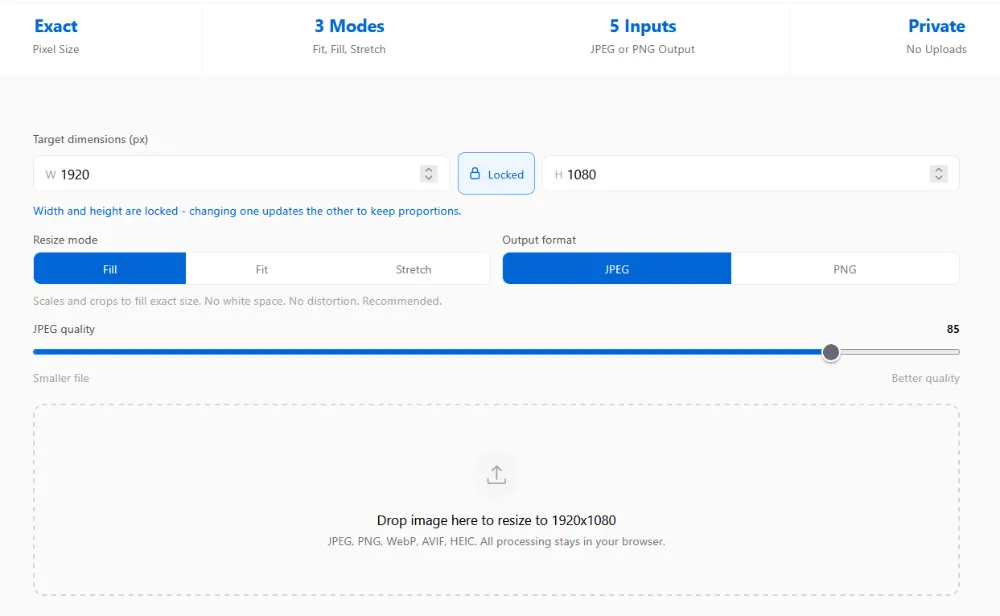
Go to the resize tool and drop your image in. Enter your target width and height, or use the aspect ratio lock so changing one dimension automatically calculates the other, keeping your original proportions intact rather than distorting the image.
Choose Fill mode if you want the output to exactly match your target dimensions with the center cropped to fit, or Fit mode if you'd rather nothing gets cropped at all, with padding added instead. Neither mode distorts the image, unlike Stretch, which forces exact dimensions regardless of the original aspect ratio and should only be used when some distortion is genuinely acceptable.
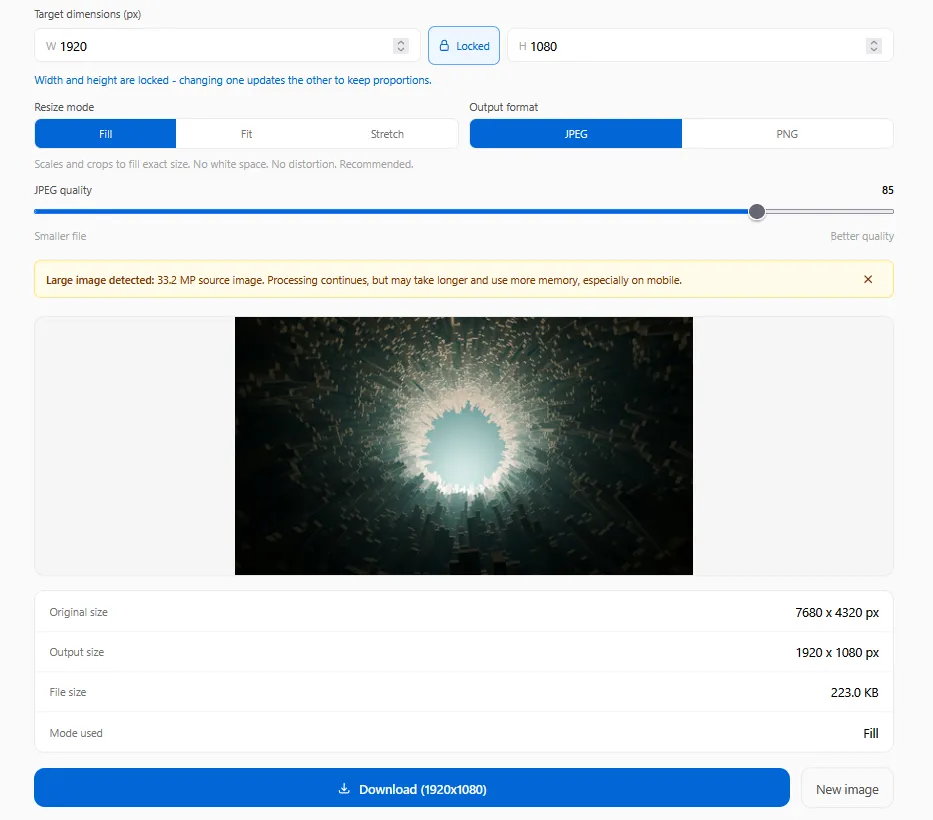
Here's a real result rather than a theoretical one. A 7680 by 4320 pixel source, an 8K image at roughly 33 megapixels, resized down to 1920 by 1080 in Fill mode came out at 223KB as a JPEG at quality 85. That's a reduction from 33 million pixels to about 2 million, with the output remaining sharp because the resampling algorithm, not raw luck, handled the actual pixel averaging correctly. The result panel shows exactly this: original size, output size, final file size, and which resize mode was used, so you can confirm the numbers before downloading rather than guessing.
Reducing Dimensions for a Whole Batch
If you're resizing more than one image at a time, the main editor on the homepage handles a batch in one pass. Drop your images in, then use the batch resize section to set either a maximum width, with height scaling automatically to match, or a percentage to scale every image down from its own current size.
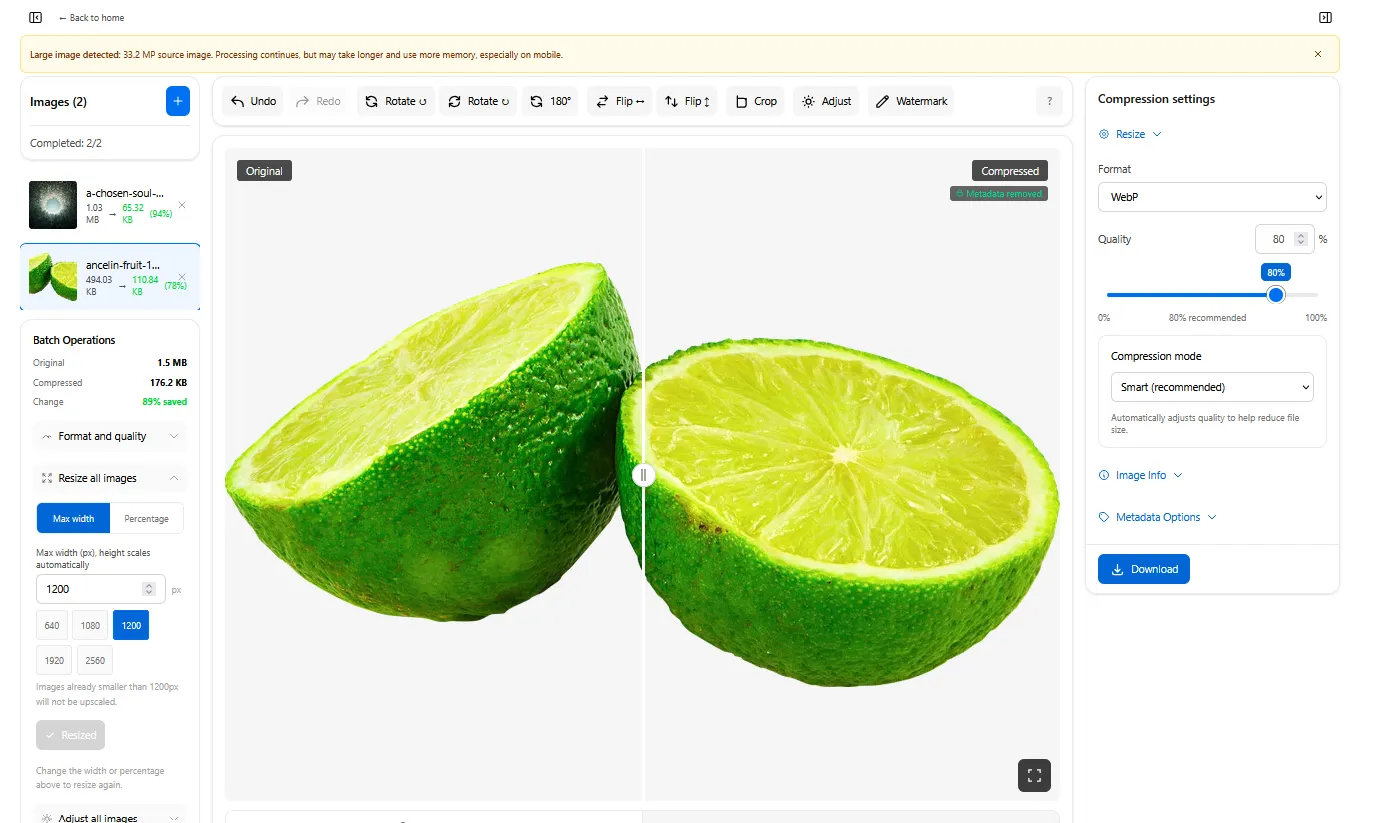
This batch ran two images through a max width of 1200px alongside WebP compression at 80% quality in the same pass. A 1.03MB photo came down to 65.32KB, a 94% reduction, and a 494.03KB photo came down to 110.84KB, a 78% reduction, for a combined batch total of 1.5MB shrinking to 176.2KB, 89% saved overall. Both images stayed visibly sharp at the resulting size, which is the actual point: the two files started at very different sizes and compressed to very different degrees, and percentage scaling handled that variation correctly rather than forcing every image toward one fixed output regardless of its starting resolution.
Percentage scaling is the more predictable option when your source images vary in size, since every photo shrinks by the same proportion rather than getting forced to an identical width regardless of how large it started. Images already smaller than your chosen maximum width aren't upscaled, so a mixed batch stays safe to run through in one go.
The Order That Actually Matters: Resize First, Compress Second
This is the single most common mistake, and it's an easy one to make without realizing it. Always resize before compressing, never the other way around. Compressing a large image first, then resizing the compressed result, means the resize operation is working from data that already has JPEG or WebP artifacts baked into it, and those artifacts don't improve when the canvas shrinks around them, they often become more visually prominent relative to the smaller image.
The batch example above did both steps in the correct order in a single pass, resize to 1200px wide, then encode to WebP, which is exactly why a 94% reduction on one image and a 78% reduction on the other both came out clean rather than blocky. The correct sequence is: resize to your actual target dimensions first, then run compression on that correctly-sized result. Reduce image size in KB and the dedicated compress-to-size tools are built for exactly this second step, once your dimensions are already right.
When "Reduced Quality" Isn't Actually a Resize Problem
Sometimes the resize step gets blamed for a problem that started earlier. If your source image was already low resolution, blurry, or heavily compressed before you touched it, resizing it down won't introduce new damage, but it also can't recover detail that was never captured in the first place. Check your original file's actual quality before assuming the resize tool did something wrong.
The other common false alarm is judging a downscaled image at the wrong zoom level. An image resized for a 400 pixel wide thumbnail will look soft if you view it at 100% zoom on a large monitor, since you're viewing far more pixel density than the image was ever meant to be displayed at. Judge the result at the actual size it will be used, not zoomed in past that.
Frequently Asked Questions
Does reducing dimensions always reduce file size too? Usually, since fewer pixels generally means less data to store, but the exact result depends on the format and compression settings applied afterward. If you need a guaranteed file size rather than just a smaller one, pair resizing with a dedicated target-size tool.
Is there a resize algorithm that works best for every type of image? Not universally. A general-purpose bicubic-style resize handles most photographs well. Content with sharp edges or fine detail, text, product shots, architectural photography, tends to hold up better with a more detail-preserving method like Lanczos, at some cost in processing time.
Should I sharpen an image after resizing it down? A small amount of sharpening after a significant downscale can restore some perceived crispness, since resampling naturally softens fine detail slightly. Oversharpening introduces visible halos around edges, so treat it as a light final touch rather than a way to compensate for resizing too aggressively.
Why does my resized image look fine on my phone but soft on my monitor? Different screens have different pixel densities. An image sized correctly for a typical phone display can look under-resolved on a high-density desktop monitor viewing it at a larger physical size. This is a target-size mismatch, not a flaw in the resize itself.
Can I resize an already very small image up without it looking bad? That's enlarging, a different operation with different tradeoffs, since new pixels have to be invented rather than removed. It's covered by a separate concern than dimension reduction, and the practical guidance is to always start from the highest-resolution source available when enlargement is unavoidable.
Try It Yourself
The resize tool handles single images with exact pixel control, aspect ratio locking, and a resampling method built for quality rather than raw speed, the kind of result that takes an 8K source down to 1080p at 223KB without turning soft. For a whole batch at once, the main editor scales multiple images together by either a maximum width or a percentage, the same pass that took two very different source files down 94% and 78% respectively without either one looking rough. Whichever you use, resize first and compress second, and the two operations stay clean instead of compounding each other's artifacts.
Related articles
How to Resize an Image Without Cropping It
Most resize tools crop your image to force a new aspect ratio, cutting off whatever does not fit. Here are the three real ways to resize without losing any content.
ReadHow to Reduce a Photo to a Specific File Size (Not Just Compress It)
A quality slider doesn't know what file size it will produce until after the fact. Here is how compressing to an exact KB target actually works.
ReadWhy Is My Image File So Large and How to Fix It
Your phone takes a photo and it's already 8MB. We break down exactly what makes image files large across every format.
Read